Intro
As you already know, Bytes Route is an application that helps you create interactive tours for web applications. A tour can help users get notified about changes in your website, assists them to better understand your web application, or guide new users through your site.
A tour contains a collection of one or more steps. Each step has an associated webpage element.
For Bytes Route, a big challenge was to ensure that we correctly store element DOM references during the creation phase, in order to highlight the same elements when a tour is being run.
In this article, we will discuss the method we chose for detecting an element on a website page, how do we know if the element was selected correctly and the problems we faced using this method.
CSS selector: the best way to select an element from DOM?
There are many methods that you can use for selecting the DOM element. You can select an HTML element by its tag, by its CSS class, by the id, or even by its DOM position.
In complex web pages, where the DOM can have multiple elements with the same properties, an HTML tag or a class name is not enough to find the element you are looking for. Of course, the id would be the optimal solution for finding the element, because of its property of being unique on a web page. But, what can we do if the element doesn’t have an id?
A solution would be to combine all of its properties, like the tag name, the CSS classes, the DOM tree position, and generate a unique anchor selector from these.
The searching and storing of a unique anchor selector is the hardest part since highlighting the element in the running phase is easily done using the querySelector method.
At the end of this post, you will find several articles I found to be helpful on the subject of searching and storing a unique reference to an element.
How we create a unique CSS selector
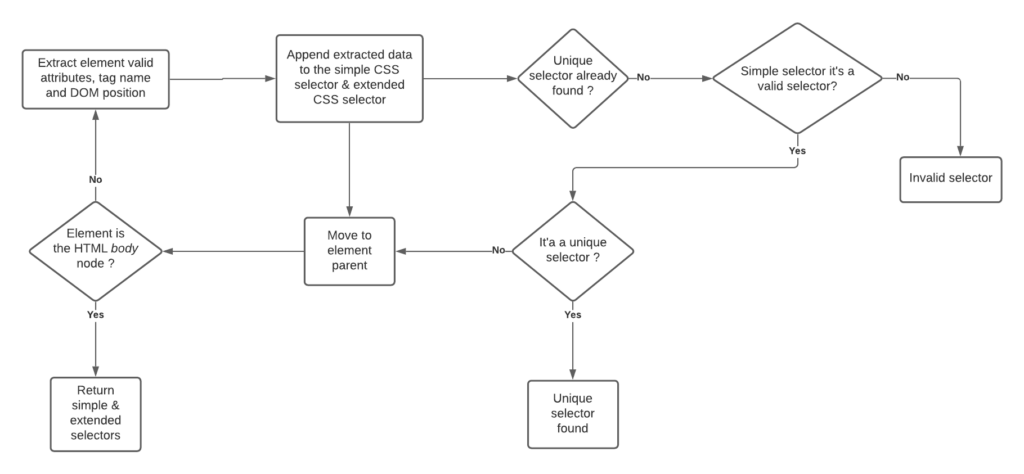
For Bytes Route, we created an algorithm that generates 2 CSS selectors for a DOM element:
- an extended selector
- a simple selector
The extended selector represents the DOM path between the HTML body tag and the element we are looking for, while the simple selector is the small unique part from the extended selector. The algorithm is divided into several steps:
- Extract the tag name, the DOM position, and the valid attributes of the element.
- Using the data obtained from step 1 create the simple and extended CSS selectors for the element.
- If the unique selector has not yet been found, we check if the simple selector is unique, and if it is, we keep it as the unique selector.
- Repeat the above steps for each ancestor of the element until we reach the body tag.
- Return the simple selector and the extended selector (if one has been found)

Note that the simple and the extended selector can be the same. The extended selector is used in case we fail to detect the element using the simple selector.
The string below is what we call an extended selector:
body[class=\"docs\"]>div[id=\"main\"][class=\"fix-sidebar\"]:nth-child(3)>div[class=\"content guide with-sidebar index-guide\"]:nth-child(3)>h1:nth-child(2)Although it might look a little long and complex, in this particular case, the algorithm had to work it’s way up the DOM until it found a unique CSS combinator.
In many cases, the extended selector can be as simple as:
h1:nth-child(2)Other alternatives can be used for selecting an element from the document, XPath being one of them.
You must use the method that best fits your particular scenario. XPath has some extra properties for better search, but the CSS selector is faster and compatible with most modern browsers.
Problems we faced
At the moment of writing this article, we have been working on Bytes Route for about a year and during this period we faced various problems related to how we select an element from a webpage. Some issues were simple to fix, while others proved to be an interesting challenge.
For every new website we tried to test Bytes Route with, we found new challenges.
The multitude, and diversity of challenges in finding a unique selector for various web-apps can make another blog-post on its own. However, we will just stick to the most common issues in this article.
Selecting an HTML element from a dropdown
Complex websites, like aws.com or atlassian.com which offer a large suite of options to their clients, often use dropdowns to display content, actions, and options in a more compact form to their users.
Although there are some standards of implementing dropdown-like displays, like the select element, website developers often choose custom implementations of the dropdown. Some of them are pretty normal, intuitive, and predictable, others are “interesting” or “creative” to say the least. Because of this, we encountered diverse challenges when we want to select the HTML elements from inside.
In the tour creation process, with Bytes Route, the dropdown is opened manually by the creator but, when the tour is being run, we must figure out how to automatically open the dropdown when the tour user reaches that step.
To have a valid solution for most of the dropdowns that we reached, we had to find a common property that all of these had. Essentially, all dropdowns implementations have at least one common characteristic: they add some custom CSS classes on a specific element to show or hide it from the page viewport.
We solved this issue by detecting the “potential” dropdowns from the webpage using the common trait I mentioned above. We separated, and kept the dropdown’s CSS that it had on, at the moment it was opened. When users run the tour, we applied the stored CSS styles to open the dropdown if it is necessary.
Selecting an HTML element from a dynamic and repetitive DOM tree
Another interesting problem we faced on applications where HTML elements are less descriptive and poor on attributes.
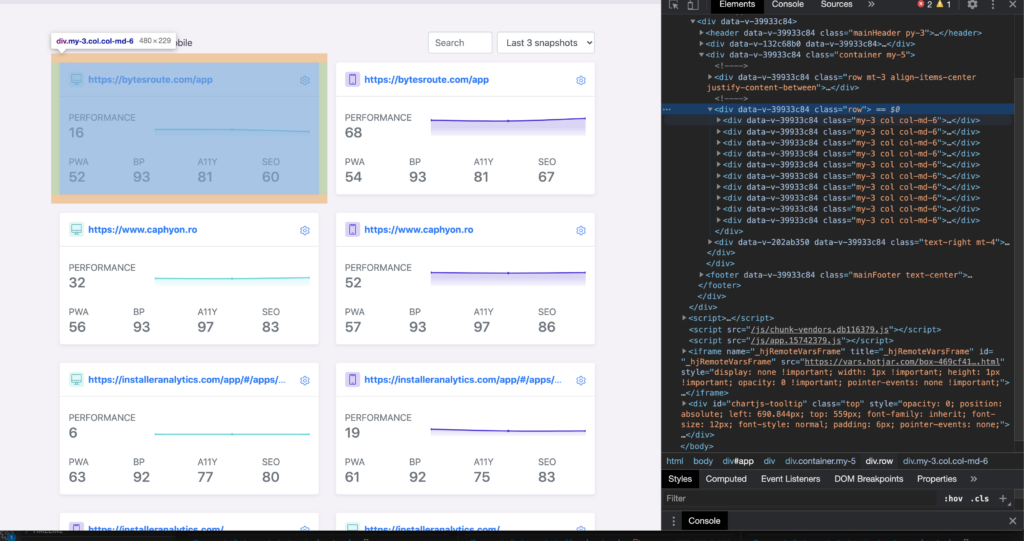
In a web application such as Single Page Applications (SPA), it’s common to find a repetitive DOM that is dynamically modeled according to the operations that the user performs.

Because the DOM can constantly change in a web application, the CSS selector we create for the element may no longer be valid, or, due to a mutation, the position of the element may change. Because of this, the selector ends up pointing to a different element during the tour running phase.

Above is an example of a DOM mutation where the “Compare Snapshots” button appears after the document is fully loaded.
If we had selected “Compare Snapshots” as a step, the following selector would have been generated:
button:nth-child(1)Because for a fraction of a second, the “lightning” button is the first and only button of its parent, it ended up being incorrectly selected by the algorithm.
To fix this problem, first of all, we had to understand what elements can cause mutation of the DOM. As a result, we decided to focus on the steps that can trigger an action such as a button or an input.
For these steps, we have introduced a Mutation Observer which we use to detect if the DOM is in a transformation process. As long as it suffers mutations the running process will be paused and will start when the actions are finished.
List of helpful articles:


