Bytes Route’s product team followed this technical approach to develop the HTML element selection that makes the solution accessible and agile.
Using our proprietary solution for selecting elements on a page instead of using libraries like most of the players in the digital adoption industry comes with some very cool benefits:
- Product security – we do not load (inject) any external (third party) libraries
- Unmatched software product stability and a very low error rate
- Small footprint since it will not load the page
- Total control over the code
This is not an easy task. The main challenge is detecting uniquely each HTML element in the web application interface.
From the very beginning, our vision was very clear. We want our users to be able to use Bytes Route with as few coding skills as possible.
So, we set our objective to find a way for any professional to be able to create tours no matter how tech-savvy or coding-savvy she is.
Almost immediately we dived into the automatic element selection.
Bytes Route started with 2 core ideas:
- It should be easy to build tours
- People with no coding skills could use it
To get started, the idea was that the user should only hover over the DOM elements and select its element by clicking on it.
So, to do that, we had to add two HTML DOM events on the element:
- A hover event, for highlighting hovered page elements

2. A click event for selecting an element and adding text to it
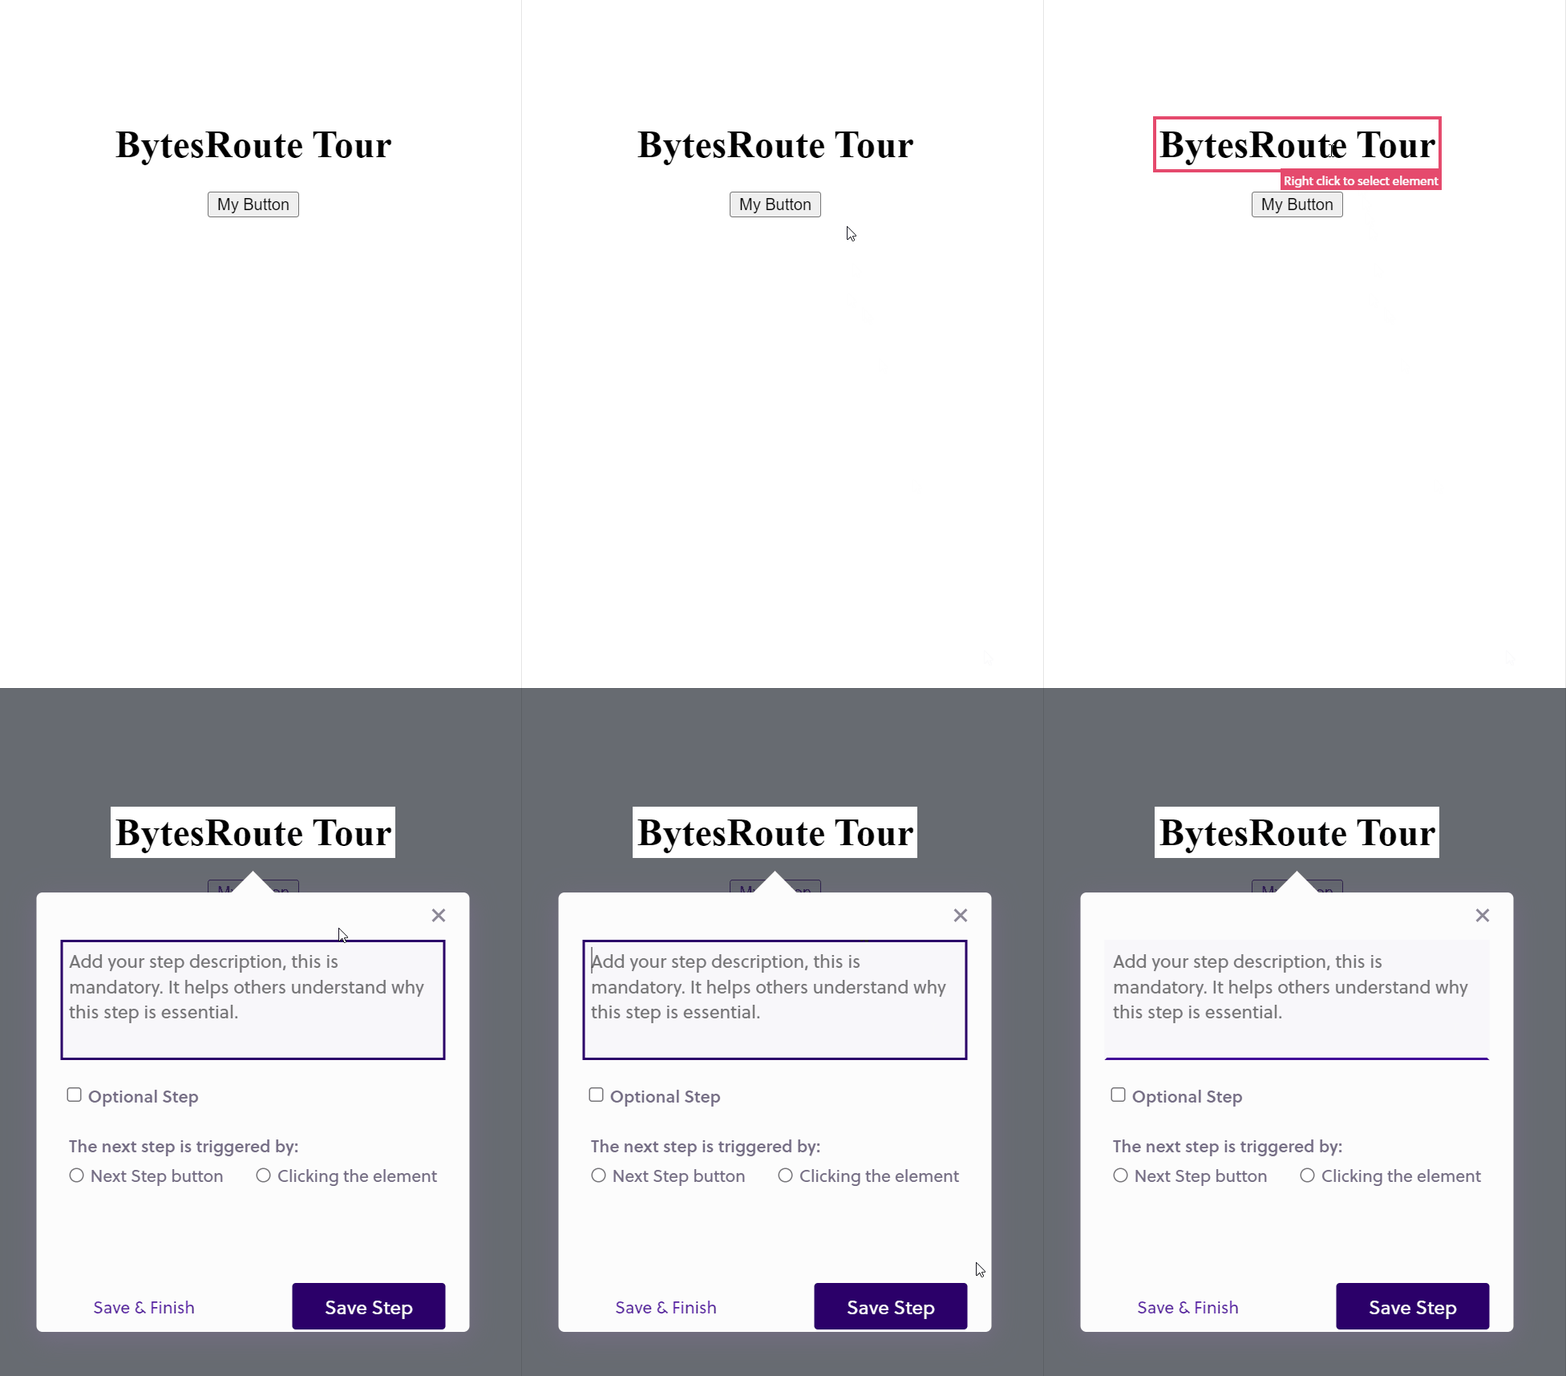
The Bytes Route product team tackled the development of element selection as a series of challenges
Challenge 1: How to highlight elements in the DOM for tour creators?
Tour creators would need a reliable way of knowing what DOM elements are tied to what tour steps. Thus, there was a need for an “anchor selector”, a way to highlight elements on the page and save them. Something that would allow for steps to run again, tied to the same elements for tour consumers.
We turned to the hover event since it would help to highlight the element when the user hovers over it. This lets the user know which element will be highlighted when the tour runs.
We went through a few versions of highlighting the element until finding the right one for our needs:
Version 1: Using the border CSS property
The first and obvious one was to add a red border to the element, but we quickly realized that the border occupies space in DOM. The highlighted elements would shift their position when the border was added, and it moved elements in the page – so this wasn’t a nice user experience.
Version 2: Using the outline CSS property
To avoid shifting elements in the page when adding a red border to the highlighted element, we switched from the border property to an outline property, outline does not occupy space in the HTML DOM.
This solution was good. However, some elements on the page already had this CSS property. This would lead to overwriting the outline property and breaking the appearance – something that we didn’t want.
We then realized that it’s better to just let the CSS of the element go, but we still needed a solution to highlight it.
Version 3: Inserting a dynamic element on hover
We figured that if we cannot alter the hovered element without altering the page, we could insert a new element with a red css border. Then, the element can be positioned and resized to fit exactly on top of the hovered element.
The steps in this version would be:
- When an element is hovered over, catch that event.
- Get the top and left position relative to the viewport and its height and width.
- Create and insert a new element on the page with the above positioning and size.
- Add a red css outline to the new element.

When the cursor moves and a new element is hovered, the above logic runs again. This is the reason we added the hover event.
After building an intuitive element highlighter, the next challenge was to save a reliable reference of the DOM element. We wanted to do this so that when the tour was running, the script was able to find the saved element on the page.
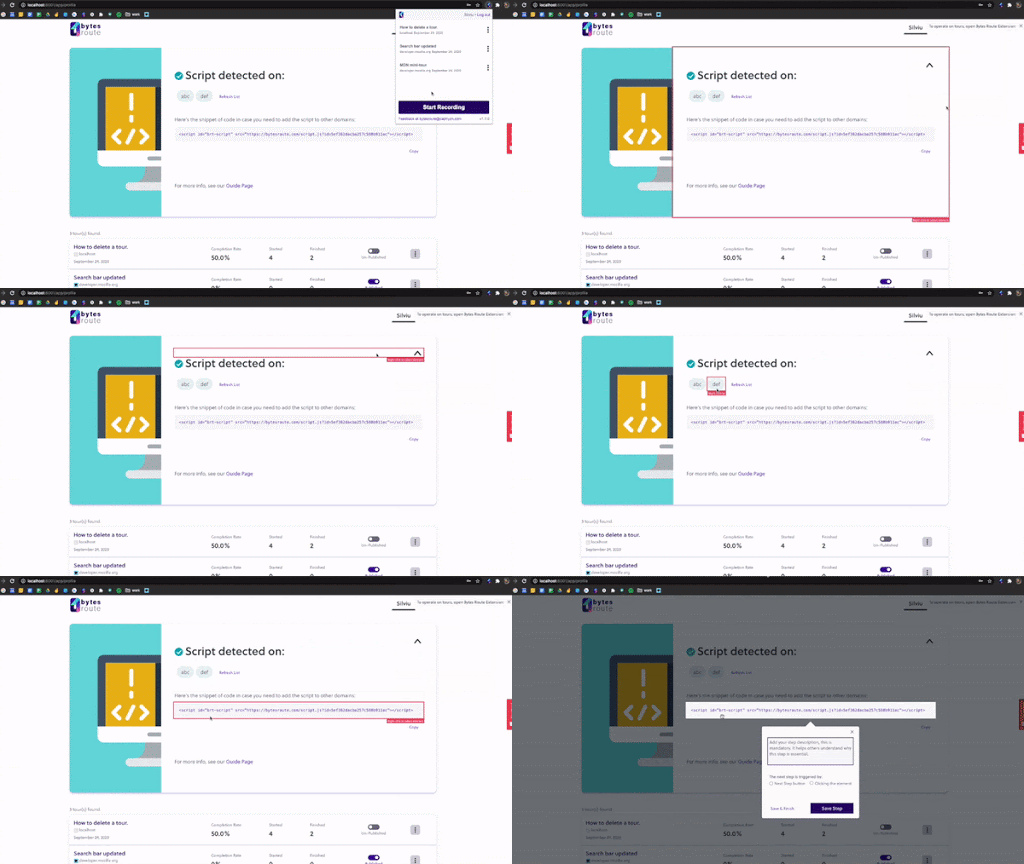
The click event triggers when the user right-clicks the element.
Challenge 2: Right clicking to save an element
The user found the element, but now needs a way to press a button in order to save a reference to that element.
Initially, we let users select elements by left-clicking as it seemed a more intuitive action for navigating web pages. However, on some elements, such as buttons or links, another event was being triggered before ours.
We fixed this problem by disabling other events on that button.
After testing further, we realized another issue: the left click event wasn’t necessarily triggered on the selected element: it could be triggered on the parent or grandparent element.,
This led us to choose a less common interaction: the right click event. We did it using the ‘contextmenu’ event.
Challenge 3: Alternative key combinations
Before deciding on right clicking as the action that selects an element, we also took into consideration combinations of keys. Some of these were CTRL key + Left click, but we decided it would be too complicated, and it would be more straightforward to use just one button click.
The end result
The tour creator would have a stable anchor selector that would highlight page elements without breaking the style or positioning of the elements on the page while doing so. The creator could also save a reference to the hovered element by right-clicking it.
Tour running challenges
After overcoming the challenges of tour creation, the next challenge would be to get the tour consumer experience right. The biggest challenges here would be highlighting elements in the DOM for tour consumers and handling custom dialogs.
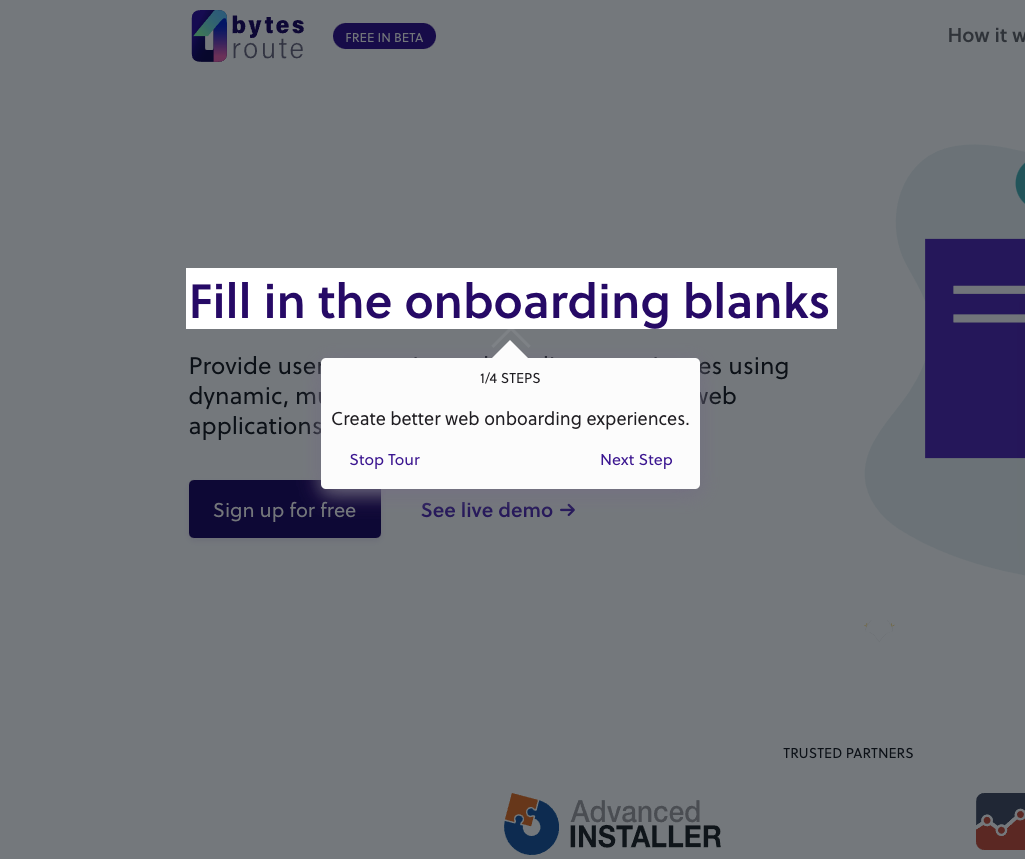
Now that the user selected the element, how would we highlight it for the tour consumer?
Version 1: high z-index opaque overlay + element on top of it
Initially, we decided to use the same principle as in modals, by using a semi-opaque or semi-greyed out overlay and adding a selected element ‘over’ it.
How can we do this? Just add the overlay of the whole viewport with a big value z-index and then add an even bigger z-index on the selected element.
But, that idea dropped like a fly because of the way the z-index CSS property works. So, the z-index’s definition says this: The z-index CSS property sets the z-order of a positioned element and its descendants or flex items. Overlapping elements with a larger z-index cover those with a smaller one, but if the parent of the selected element has the z-index property lower than our overlay then the element won’t overlap the stack level of the box in the current stacking context, so we cannot overlap the overlay with our element in all scenarios.
“Outside the box” solution
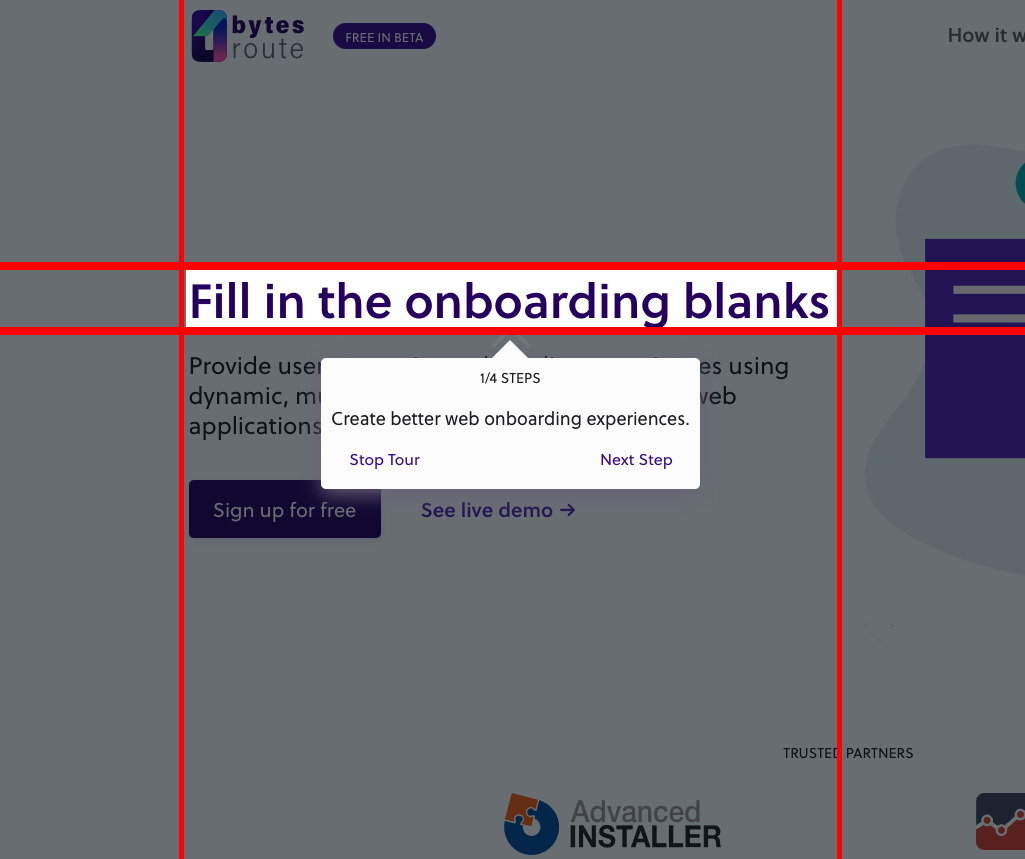
Since we couldn’t place the element on top of the overlay, what we did was “punch a hole” that has the position and size of the element. We created four overlays that surround the element, using the same properties of the element: same width, and height and same viewport relative positioning (top and left properties to viewport) as on the hover event.
Saving a unique reference to the element
After highlighting the element, our next challenge was to find a unique selector that we would use to find the element when we run the tour.
Challenge 1 – finding a unique attributes combination
Our first approach checked: if the element had an id attribute, then the element should be unique on the page, otherwise, and this is the interesting part, a recursive function would be called that adds an attribute, one by one, and tests if the selection is unique in the page. If all the attributes of the elements were added and the selection was still not unique then it would continue with the same logic on its parent and so on until a unique combination is found.
Challenge 2 – adding attributes exceptions
The logic was good but not all of the attributes were reliable. We had to make a list of exceptions as the testing continued, like the attributes specific to the big frameworks like Vue.js, Angular or React. Besides that, the class and style attributes created problems because certain classes of certain styles were added right before the element was hovered or focused or active so we had to ditch them.
Challenge 3 – multiple elements with the same ID on the same page
Some pages would have multiple elements with the same ID on the page (which obviously is a bad practice). We ditched the idea that if an element has an ID, it is also unique and we treated all elements like the ones without an ID;
Challenge 4 – the selected element loading after searching for it
This was fixed by waiting for the page to fully load with the help of the document object property ‘readyState’ where we checked if the value was ‘interactive’ or ‘complete’. This check was wrapped inside a setInterval function.
Challenge 5 – searching for elements before navigation is completed
The script searched for the element before changing the page on which the element belonged and instead found a similar one on the current page. This was fixed by saving the URL of the page where the element was and checking if we are on that URL when running the tour.
Challenge 6 – elements with autofocus
Some page elements had autofocus and when the modal for the step description was opened, users couldn’t write the step description inside our input box, because the selected input was autofocusing itself. This challenge was fixed by enforcing the focus on our input by adding an event that checked if our input was currently focused and if not, focus it.
Challenge 7 – elements inside of dropdown menus
And… the last one. This one proved to be a little more challenging and was not a solution for all cases. The idea is that when the element belongs to a custom dropdown or a modal that closes when – it doesn’t get focused or activated.
We managed to find a solution for custom dropdowns and modals with the help of CSS. The way it works is that when closed, it gets hidden in some way.
We are still looking for a proper solution for the ones that are completely removed from DOM and readded when opened.
The issue was that when we wanted to highlight an element that had a dialog parent – which closed when losing focus or when it wasn’t active – the element would hide alongside its parent and the script would find nothing to highlight.
To sort this out:
- First, we had to figure out which parent was the dialog element,
- Then, we had to see what we could do to keep it open until we move on to the next step,
- And finally, we needed to find a way to hide it again when the step ended.
So, we tried to fix it in a raw manner with a list of possible elements and classes hidden with specific CSS, such as “display:hidden” or “opacity: 0” etc. We failed because there are a lot of possibilities for hiding an element with CSS, in the DOM.
Note: You can check these articles:
- https://allyjs.io/tutorials/hiding-elements.html
- https://www.sitepoint.com/hide-elements-in-css/
- https://torquemag.io/2021/08/hide-elements-css/
On top of these, there were some hiding methods, which were either funny or highly ingenious such as adding this property to elements:
left: -15000pxThe solution was to go through all the element ancestors and save their CSS before the element lost focus or wasn’t active anymore. We would check if any of the CSS properties from all the ancestors were different, and if it was, we would apply that difference to that certain parent.
Through this method, we found which of the ancestors was the dialog, we detected how it was hidden and we knew how to hide it again when the script was done by removing the CSS differences.
Final thoughts
The challenges above were only some of the most interesting ones, but tackling and trying to find a solution to each of them made Bytes Route into an ever-more stable product.
It has been a nice journey so far and we can’t wait to tell you about the next chapter in the near future – as Bytes Route grows, improves and adds more features with each release.
We continue to perfect our product and build something that covers most users’ needs. Our users gave us the feedback needed to improve and evolve this product, so a big thank you to everyone who reported bugs and issues 🙂
